Friday, December 20, 2013

ikea lamp hack and upcycling By: bermill

bermillBG


To hack the Orgel Vreten lamp, you need -old- Orgel Vreten lamp, old small gas bottle found somewhere.


What you do: Cut the bottle into two, make one hole on each top, insert one on top and one on the bottom and choose a tissue to cover …


Good luck!


via IKEA Hackers http://feedproxy.google.com/~r/Ikeahacker/~3/TK3yzC9wB90/ikea-lamp-hack-and-upcycling.html From bermill

Thursday, December 19, 2013

Fake bookcase hides secret cabinet By: Dan Tappo

image-3


My 7 year old son has this random collection of stuff he calls his ‘mini museum’ – rocks, fossils, marbles, old film canisters – in other words, he’s a hoarder! Anyway, he asked if I could make a display cabinet for it all but added that he wanted the cabinet to be disguised so that it wasn’t obvious to people that it would have a treasure trove of stuff inside.


image-6 image-7


So I came up with this fake book-case cabinet. If you can get hold of enough books, it’s pretty straightforward. It’s going to be a Christmas present for him which explains why at the moment, the display cabinet is empty. I’ll try to upload another picture when it’s in his room and in use. Here’s how I did it:


* Get one 4×4 Expedit and build it!


* On the sides at the front, attach two pieces of planed timber. You’ll be hinging the ‘bookcase’ doors onto this timber because the Expedit doesn’t have the structural integrity to hold the hinges (at least I assumed it didn’t). The timber I used was 34mmx34mm. I used that size only because the hardware store I went to had a bolt-screw that was exactly 34mm longer than the screw that comes with the Expedit unit. This meant I could screw through the timber into the Expedit and hold it together exactly as securely as normal. I then painted the timber white.


* The book case doors are 12mm MDF painted white (although timber would be better and a bit thinner better again). The ‘bookcase edges’ are planed timber 25mm x 25mm and then shelves are 25mm x 15mm. I cut all the pieces to size first – the doors, then the bookcase parts and then the books. I nailed the bookcase into place from the book and as for the books, I just cut them on a bandsaw and then glued them into place.


* I used 3 hinges per side to hang the doors but that was overkill – 2 would have been fine.


Note that the doors are quite heavy to do tend to want to swing open. For this reason I cut the doors at an angle (where they meet in the middle) so that one holds the other shut. However, I needed to put a bolt on the top to hold the first door in place. I neatened up the look of that by cutting a hole in a final book to hide the bold. When the doors are open they do cause the whole Expedit to lean forward a fraction which means closing them is hard. I put two drinks coasters under the front of the Expedit which raises it up enough to stop that happening.


image-1 image-5-550x412


* To finish it off, I got a 4 strip Dioder white light and secured one in each of the Expedit boxes. I also got two glass inserts for the top two boxes. Lastly, I got a bit of white hardboard and secured it on the back so that you couldn’t see the skirting board and wires behind the bottom two units.


* Overall, it took about 14 hours split over a couple of weekends (it was waiting for paint to dry that stopped this being a one weekend project). I did it with really basic tools (except for the bandsaw for the books) – but if you look closely it is a little rough around the edges! In addition to the cost of the Expedit, lighting and inserts, it cost me about 15 quid for the timber, hardboard, paint, and catch. I got the books for free.


via IKEA Hackers http://feedproxy.google.com/~r/Ikeahacker/~3/LDyONYdO8RM/fake-bookcase-hides-secret-cabinet-2.html From Dan Tappo

Expedit mini desk/nightstand for a tiny bedroom – $40! By: Alex

expeditdesk


Materials: 1 Expedit 2×2 (201.353.00)


Additional frills: 1 Jules visitor chair (898.353.18), 1 Fillsta table lamp (501.550.18)


Description: If you have a small bedroom, using the same piece of furniture as a desk and a nightstand makes perfect sense. I repurposed an old white Expedit 2×2 by taking out everything except the top and two sides. If you’re building this from scratch, you’ll just need those three parts (don’t worry, it’s perfectly sturdy). I think it’d look great in any Expedit color, or you could paint it yourself.


I squeezed this into a tiny space by my bed with a Fillsta lamp and a Jules chair. Start to finish, the desk shouldn’t take you more than 3 minutes to assemble, and it’s a tenth of the price of mini desks from fancy furniture stores.


via IKEA Hackers http://feedproxy.google.com/~r/Ikeahacker/~3/SlQeRXWFcQw/expedit-mini-desknightstand-for-a-tiny-bedroom-40.html From Alex

Wednesday, December 18, 2013

KURA bed makeover By: DONEVA Galina

DSC_1201


I was really tired of my boy’s blue bed. And I wanted to make them some kind of a wooden house… And then I got an idea…


I simply removed the blue surfaces on the side; then I used some montage adhesive to glue the battens.

Finally I put the curtains on a simple rope.


And there it is!


via IKEA Hackers http://feedproxy.google.com/~r/Ikeahacker/~3/b9YuvmnG3N0/kura-bed-makeover.html From DONEVA Galina

Tuesday, December 17, 2013

Expedit Desk setup By: Ash

2013-12-10 14.22.25


After gaining inspiration from the many Expedit hacks already on the site I thought I would give it a go myself. I wanted a decent size L shape desk with storage for my spare room. After looking at many different styles in the store I decided on Expedit and went with:


1 – 2×2 Expedit (black brown)

1 – 4×2 Expedit (black brown

1 – Expedit Desk add on (black brown)

1 – Signum cable tidy


I then picked up from my local hardware store:


L brackets

Flat brackets

Screws

WoodGlue


I laid down the 4×2 on its side, then sandwiched the desk top piece with the 2×2 unit. Using the L brackets, flat brackets and some decent size self tap screws fixed it all together.


I made a larger shelf by removing one of the small pieces to make room for my printer, then used the leftovers to raise my main pc monitor up to match my TV.


2013-12-10 14.26.48

2013-12-10 14.40.45


My favorite part though has to be the SIGNUM cable management, so clean and neat for only £10 its a must for any desk!


I have so much desk space leftover so may add a third screen in the near future. I may also add in a couple of the drawer units that slot into the boxes as right now i just have the fabric storage bins.


All in all a fairly straightforward hack but I’m very pleased with it and will definitely be doing more things like this in future!


via IKEA Hackers http://feedproxy.google.com/~r/Ikeahacker/~3/DYbtnnZwAxo/expedit-desk-setup.html From Ash

Monday, December 16, 2013

Christmas nativity in a Rotera lantern By: Mazinga

I realized a Christmas Nativity scene in a ROTERA Lantern made for block candle.


You need: ROTERA Lantern for block candle (002.528.61), cutter, polystyrene, battery powered led lights, hot glue, plasticine, sawdust, gypsum plaster, acrylic colors, brush, 8 statues.


01. use 4cm depth polystyrene and battery powered led lights


01


02. cut some stairs as you like


02


03. fix led lights chain between the glass using hot glue


03


04. make an arch with plasticine realizing also some bricks


04


05. mix sawdust and gypsum plaster in 9:1 ratio (almost)


05


06. fix it in some parts of the arch (when plasticine is solidified


06


07. … on the 4 sides


07


08. smooth out if you like


08


09. put the sawdust and gypsum plaster on the hexagonal base


09


10. check if all the nativity statues are o.k. on the base


10


11. colour the base with brown acrylic color diluted with water in 1:20 ratio


11


12. use 4-5 different browns, white, 2 different yellow and dark green


12


13. colour the leaks among the bricks with full color (not diluted) and immediately wash the excess of color with a wet sponge


13


14. … so the darker color remains only in the leaks among the bricks


14


15. colour some bricks with different brown colors and realize the wooden doors


15


16. colour them with acrylic full color (not diluted)


16


17. assemble all the pieces with hot glue


17


18. put it in the ROTERA Lantern for block candle (002.528.61)


18


19. I prefer to replace the front frosted glass with a normal glass to better see Jesus
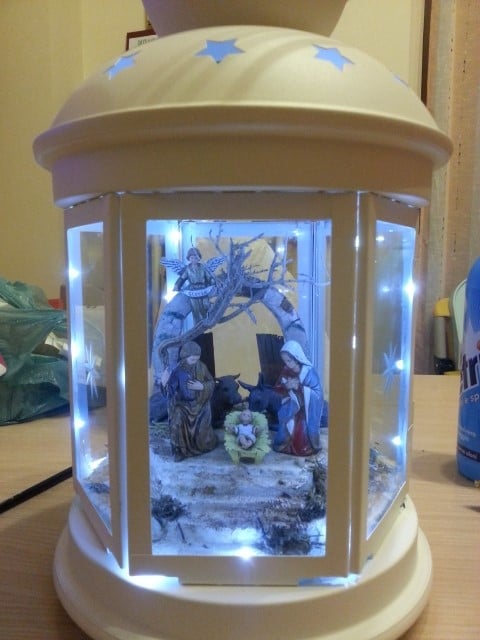

19


MERRY CHRISTMAS


Gerardo P.

Foggia, Italy


via IKEA Hackers http://feedproxy.google.com/~r/Ikeahacker/~3/LZZbK2jC008/christmas-nativity-in-a-rotera-lantern.html From Mazinga