Wednesday, October 23, 2013

Expedit built in room divider By: khedron

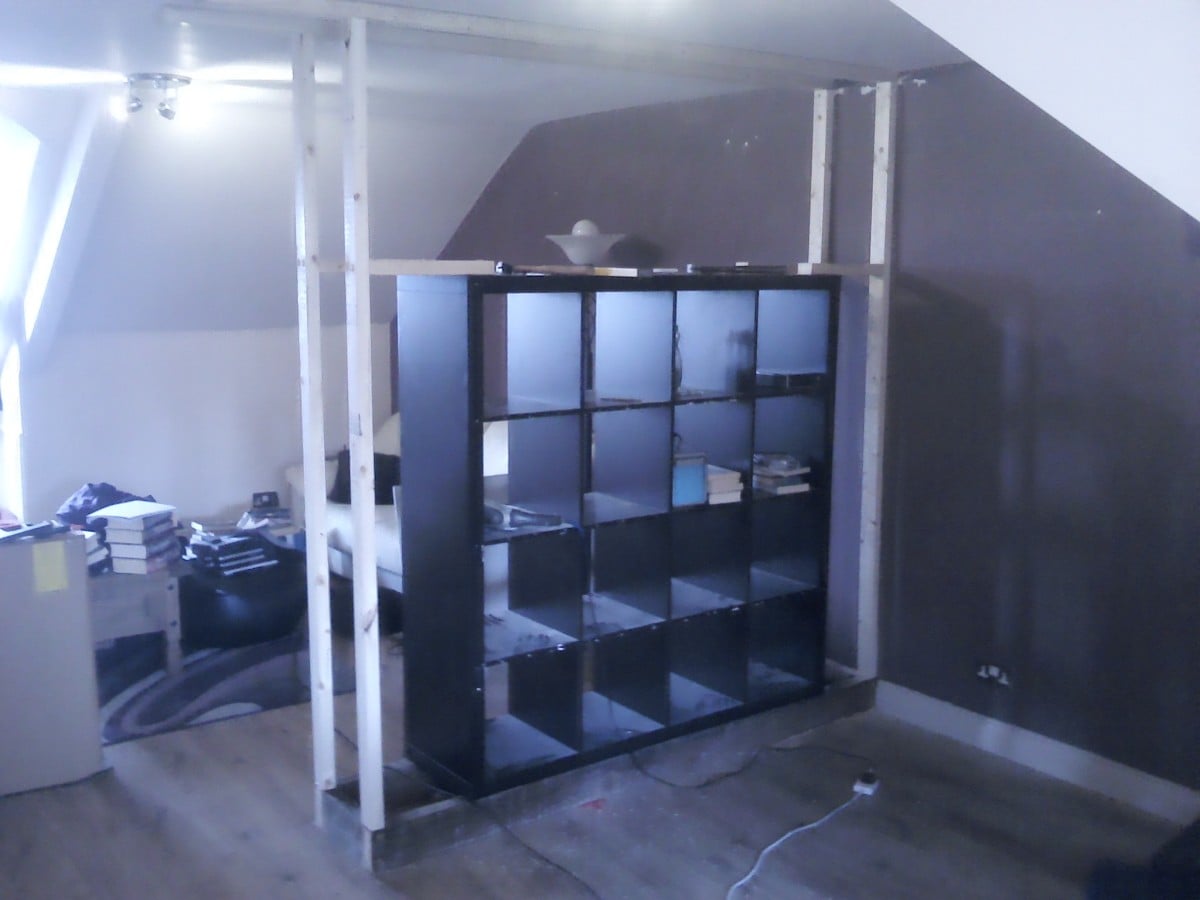
This is my attempt at an Expedit room diver, it all began with a large attic flat I have which was two rooms but someone knocked into one. I looked at ‘canned’ solutions to dividing the rooms and didn’t really like any of them. A friend gifted me a black Expedit he no longer had a use for and I promptly stuck it in the middle of the floor for a few months before I got around to doing something useful with it. You’ll notice the finished picture below has spotlights in the top four cubes, I don’t actually like this now it’s done but it does give a nice lamp effect to the room when it’s dark but not exactly what I was going for.


IMG_20131021_125310


The project started with building a framework around the Expedit.


1372604228802


1372687730024


IMG_20130701_194329


After the frame was built, it was time to get the plasterboard (drywall to North Americans?) on, and get it plastered.


1372776112750 IMG_20130714_115247 IMG_20130714_115235 IMG_20130714_115223


I then scuffed up the black colour so the paint adhered better, added architrave, undercoated twice, and finished with three coats of silk magnolia.


IMG_20130723_230145 IMG_20130723_202716


via IKEA Hackers http://feedproxy.google.com/~r/Ikeahacker/~3/bUJYOSflIP8/expedit-built-in-room-divider.html From khedron

Tuesday, October 22, 2013

The KEY to a dressed up Malm dresser By: Christal

IMG_0067


2013-06-22-13-47-13

before


This is actually a Malm dresser I had hacked before with some Mod Podge and fabric. Unsatisfied with how it worked in my bedroom space, I tried to make it look a little more grown up, while keeping it a strong and unique feature piece. Here’s what I did:


1) To prep: Sanded down and primed the dresser and drawers.


2) To paint: Applied 3-4 coats of acrylic paint color “Harvest Pumpkin Orange.”


3) To decorate: Used 3M blue painter’s tape to create crisp border lines on the drawers’ faces. I used a thicker consistency acrylic paint called Liquitex BASICS in Black.


IMG_0066


4) To seal: I used Mod Podge to seal the acrylic paints.


5) KEY feature: I found these great over sized keys from Michael’s that I wanted to buy, but didn’t know how to use them. Luckily, this project gave me a chance! I painted the keys black using the same paint I used on the drawers. I picked 3 different pairs of antiquated styles.


IMG_0064


6) Final finish: I applied the keys where drawer handles would normally be using E600 glue.


Super happy with the final product! I think this is a great and simple way to showcase a collection of knick knacks or small items while dressing up your Malm dresser.


See more of the Malm dresser.


via IKEA Hackers http://feedproxy.google.com/~r/Ikeahacker/~3/qopVbk96V7I/the-key-to-a-dressed-up-malm-dresser.html From Christal

Monday, October 21, 2013

Hackers Help: Is the table I’m talking about Vittsjo or not? By: Lisa

vittsjo-nesting-tables-set-of-__0135349_PE292040_S4


Last spring, I went to the closest Ikea store from me (which is 6 hours away!) in Canada. In the presentation area right next to the entry was a living room set-up.


They used four small side table to create a coffee table. They were not very big, probably 1′ x 1′ x 1,5′. The legs were made of raw/birch wood and the top was made of glass. They were sold 10$ each. They have a very similar look to Vittsjo’s tables (see the above photo).


I keep searching on Ikea’s website and catalogue, but I can’t find anything! Does anybody know what I’m talking about? If so, how is it named? My memory tells me it could be a discountinued Vittsjo’s product, but the colour makes me doubt…


Thanks a lot! :)


via IKEA Hackers http://feedproxy.google.com/~r/Ikeahacker/~3/sIbVVe4nVTc/hackers-help-is-the-table-im-talking-about-vittsjo-or-not.html From Lisa

From RIBBA to pinboard By: Susanne Vogel

RIBBA pinboard


Materials: RIBBA frame


Description: I was saving corking for a long time, without really knowing what to do with them… then I had this RIBBA frame, where the glass was broken … suddenly those two thoughts met – I took out my glue gun and now have a cute little pinboard!


via IKEA Hackers http://feedproxy.google.com/~r/Ikeahacker/~3/aLkWPELtuoU/from-ribba-to-pinboard.html From Susanne Vogel

BILLY+IRJA=BILLIRJA spacesaving baby wardrobe By: Eugenia

P1010830


It’s a simple and cheap hack.


All you need is:

1xBILLY

2xIRJA

saw (to saw the metal IRYA rod)

screwdriver


We needed a wardrobe for the babygirl, but no place except behind the door. So, that’s our decision.


1) First assemble BILLY (or not, if you want your clothes to hang from the middle shelf – than first apply step 2,3 to the middle shelf).


2) Then cut two pieces of IRJA to fit the inner space under the shelf.


3) Screw 2 x IRJA under 2 x shelves of your choice using the fittings included.


4) Install shelves anywhere you like.


5) Put your little girl’s dresses.


Ready!


via IKEA Hackers http://feedproxy.google.com/~r/Ikeahacker/~3/07NoPDtBI2g/billyirjabillirja-spacesaving-baby-wardrobe.html From Eugenia

Friday, October 18, 2013

Ikea furniture assembly making a secret play room By: Jules IKEAHacker

2013-07-26 14.30.59_1000-792083


Materials: Kura, Malm, Expedit, Drona, Mammut, formica board


Description: What we want:

- make more place in my son’s room

- offer him a secret play room


How we do:

Firstly, we look for several pieces of furniture whose dimensions allow them to go under a Kura bed. Malm chests with 3 and 2 drawers (for clothes) and Expedit shelf (for toys) are selected.


Secondly, we assemble these pieces of furniture in this order :

1/ Kura assembly. Remark: one formica board replaces an original small wooden board (cf. photos)

2/ 2 Malm assembly and installation under the Kura

3/ Expedit assembly. Installation under the Kura: several extra battens (in the right dimensions) are necessary to support the Expedit, to make it stay upright (cf. photos). Remark: the Expedit dimensions are EXACTLY the space under the Kura, so to put it into this space, you have to go slowly with patience. The Drona fabric boxes are added for containing toys.


2013-07-26 14.21.26_900-798703

2013-07-26 14.31.35_900-795550


After the 2 Malm arrangement, the space behind them is big enough to form the secret play room for my son. This secret play room has a window which is the formica board in the Kura assembly. In order for him not to lean on the back of the Malm chest, we have added a without legs Mammut chair (cf. photos).


2013-07-26 14.22.24_900-702594


~ Ben, France


via IKEA Hackers http://feedproxy.google.com/~r/Ikeahacker/~3/xsHcB_IeN04/ikea-furniture-assembly-making-a-secret-play-room.html From Jules IKEAHacker

AUSTMARKA Wardrobe to broom cupboard By: Jules IKEAHacker

IMAG0027-741767

IMAG0029-745640


Materials: AUSTMARKA 902.289.23, original shelf, spare board for shelving, Modesty or fixing blocks, screws etc, replacement handles.


Description: Simple hack, due to no build in cupboard storage. I converted a Austmarka wardrobe into a broom/cleaning products storage unit. Fit the shelving where ever you need them.

Simple, easy and practical!


~ John in Hampshire, South England


via IKEA Hackers http://feedproxy.google.com/~r/Ikeahacker/~3/UD_1cf5EL8c/austmarka-wardrobe-to-broom-cupboard.html From Jules IKEAHacker

PANNÃ… place mat as a modern wall art By: Jules IKEAHacker

lak4uj-720995


Materials: PANNÃ… place mat, glue

Description: This is a very easy hack but can decorate even a big wall.


Step 1 – buy the right number of PANNÃ… place mat and choose the color witch suits your room.

Step 2 – put rapid dry glue (I used aquarium silicone) onto the back of the mats.

Step 3 – place them one by one. That’s it :)


lak1uj-730468

lak3uj-726671


~ Istvan Jancso, Hungary


via IKEA Hackers http://feedproxy.google.com/~r/Ikeahacker/~3/dJWLroXbGKw/panna-place-mat-as-a-modern-wall-art.html From Jules IKEAHacker