Friday, June 12, 2015

Wildin’ Out at a Nashville Family Ranchion By: Annie Werbler

Wildin’ Out at a Nashville Family Ranchion

Ivy and Josh Elrod, parents to Chance (age 3), Rev (8 months), Mr. Pickles (their 10-year-old Tabby cat), and Lana Cloud (a six 6-month-old spaz/puppy), relocated to Nashville from Brooklyn toward the end of last year in a hurry. The family purchased a house just two weeks before opening their design store and gallery space called Wilder, “because we are crazy,” jokes Ivy, who is an accomplished dancer, actor and writer. Josh, a talented painter and actor, actually performed onstage as a Blue Man for ten years before this latest chapter in life. The 2,000 square-foot home consists of ten rooms spread out on one floor, which inspired a Brooklyn-based friend to name “The Ranchion” (ranch-mansion). “As New Yorkers, anything bigger than a bagel is a mansion.”

With a newborn child and a newer business to run, the couple set out to buy a house that didn’t require any major overhauls. Luckily for them, they found this updated 1950s home that included a 2014 addition with modern conveniences. They especially love the big half-acre lot on which the property is situated, rare for this boomtown where developers are squishing buildings more closely together than ever before. Another nostalgic feature is the train that runs behind the house, which is visible through the trees during winter. The couple is finished with moving for a very long time, especially because Ivy and Josh inhabited 37 apartments between themselves in total during 20 years in New York City. But just because they are setting down roots in Nashville, however, that doesn’t mean the decorating process is or will ever be finished. Keeping things changing for the family’s needs is an ongoing evolution. The vast open space in the home (when compared to previous dwellings) removes former limitations on the  process, and as Ivy explains, “allows for lots of unwieldy dancing.” To her, home is ultimately where the Elrod family finds itself together. And with all the moving she’s done in her life, “I know my feeling of home has less to do with things or geography, and everything to do with where my people (creatures) are.” —Annie

Photography by Skye Parrott, except where noted


via Design*Sponge http://ift.tt/1cQ3qQa From Annie Werbler

BH&G 10 Decorating Ideas to Bring the Beach to Your Home From Madison Ottenbacher

Today's Inspiration comes from Better Homes and Garden's Style Spotters Madison Ottenbacher.

I have always been a beach-loving girl. I don’t know if it’s because of the salt in the air or the sand in my hair. But every time I’m there, I feel an overwhelming sense of peace, tranquility and relaxation. Unfortunately, a seaside vacay isn’t looking like an option for me this summer. However, I am not going to let this news drag me down (and neither should you)! If you’re like me and the seashore is your “happy place,” then do the next best thing. Experience the coastal vibe that you crave by bringing it to the comfort of your own home.


Take a peek at my top 10 decorating ideas that are certain to bring back some of that beach bliss you long for.


Bring the wild into your home by using driftwood. You can usually find this unique material washed up along the shore (or you can purchase it at a craft store). All you need is a few pieces of wood and some strong glue to transform a plain mirror into an enchanting statement piece.


1. Driftwood Mirror

via


Create a one-of-a-kind composition of your favorite deep-sea creature with a sheet of heavy-duty cardboard, a pencil, pieces of driftwood, a utility knife and a hot glue gun.


2. Driftwood Sea Creature

via 


via

Rope is a classic material that immediately gives any room a nautical feel. Place a knot rope lamp on the bedroom nightstand and let your dreams set sail.

3. Knot Rope Lamp

via


Accessorize any room in the house with sea glass vases. Skip the department store’s hefty fee and make them yourself. The materials you’ll need: clear glass vases, rubbing alcohol, a flat tipped brush and frosty glass paint. Add a personal touch to your project by leaving messages in the bottles.


4. DIY Sea Glass Vases

via


Wall art doesn’t have to be expensive. Scientific journal-like prints of seashells are available for free online. You can also make custom prints using Photoshop. For an extra vintage touch, display your prints in distressed frames.


5. Free Printable Wall Art

via


Express your love for the sea by showcasing its different elements. Consider color, texture, size and pattern when styling your dining area.


6. Coastal Table Setting

via


Collecting seashells always sound like a good idea, but what do you do with them after your coastal adventure comes to an end? Keep your seashore treasures from collecting dust in the garage by re-purposing them as household decor. Display your favorite findings by gluing shells on to wooden letters.


7. Seashell Letters

via


Who says that a garland has to be reserved for the winter months? Decorate an empty fireplace mantle or an old-wooden fence with a seaside arrangement that will never go out of style.


8. DIY Starfish Salt Dough Garland

via


The great thing about lanterns is that they can be used for practical purposes and for pretty purposes. You can welcome your guests with a lantern lit entryway or you can arrange the lanterns with other nautical accessories as decor in your living room.


9. Clear Glass Lanterns

via

Poster size images (when paired together) make an eye-catching display. What better way to reminisce over your trip highlights than with pictures.

10. Large-Scale Photos

via


Someday, I will live in a house beside the sea, but for now the sea will just have to come to me.

BH&G 12 Summer Party DIY Ideas From Chelsey Andrews

Today's Inspiration comes from Better Homes and Garden's Style Spotters Chelsey Andrews.

12 Summer Party DIY Ideas

Trend: 12 Summer Party DIY Ideas

The weather is warm and I’m ready to host a summer party. I dream of sitting outside with my closest friends and enjoying some good food, but there is one problem: my husband and I don’t have anything to throw an outdoor party. I mean, we don’t even have an outdoor table. We are not the type to go out and spend a ton of money on pre made items and we’ve been thinking about what we can make for the backyard. We need a patio table, some chairs, decor (like a tablecloth and lighting), and all the fun accessories to make a summer party a party! Below are 12 DIY’s that have inspired me to get started on getting our outdoor space ready for a party.

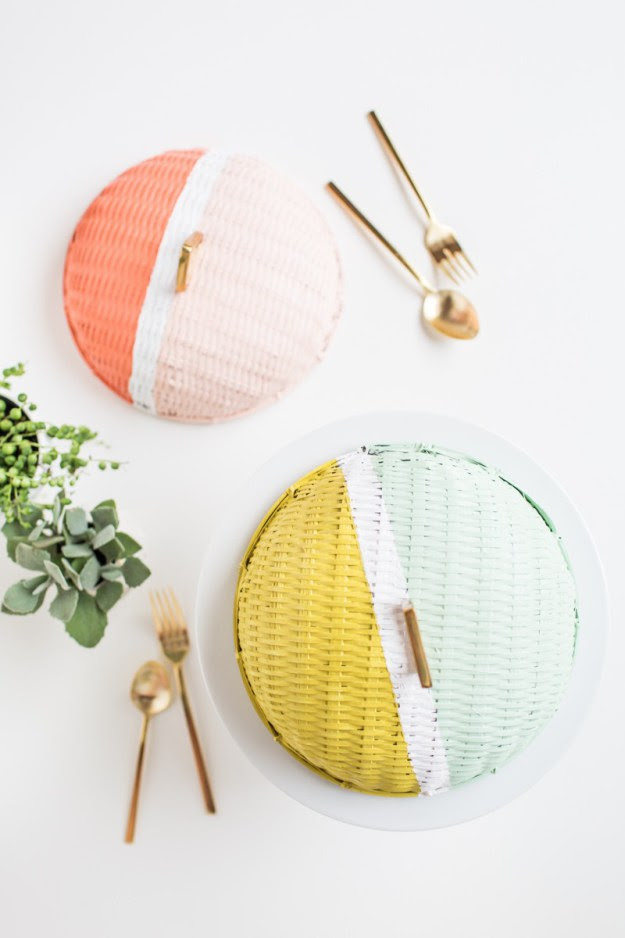
1. Keep the bugs away from your grub with these DIY color block food domes, on Sugar and Cloth.

Keep the bugs away from your grub with these colorblock food domes, on Sugar and Cloth.

2. Get creative with your cheese serving tray, from A Beautiful Mess.

Get creative with your cheese tray, from A Beautiful Mess.

3. Serve drinks in this fun watermelon keg, from She Knows.

Serve drinks in a watermelon keg, from She Knows.

4. Paint with bleach to add design to some plain cloth napkins, from BHG.

Paint with bleach to add design to some plain cloth napkins, from BHG.

5. Decorate with these fruity tissue honeycomb balls, from The House that Lars Built.

Decorate with these fruity tissue honeycomb balls, from The House that Lars Built.

6. Make these fruit kabobs and use for place markers, on Creative Live made by Brittni Mehlhoff

Fruit Kabob Place Markers/Snacks, on Creative Live made by Brittni Mehlhoff

7. These paper umbrellas are perfect drink stirrers (comes with a free printable), on The Paper Mama.

These paper umbrellas are perfect drink stirrers (comes with a free printable), on The Paper Mama.

8. Turn your boring flatware into something pretty, from A Simple Kind of Life.

Turn boring flatware into something pretty, from A Simple Kind of Life.

9. Create some pretty marquee lighting with some foam core and glitter, on BHG.

Create some pretty marquee lighting with some foam core and glitter, on BHG.

10. Turn a drop cloth into an outdoor tablecloth, from Yellow Brick Home.

Turn a drop cloth into an outdoor tablecloth, from Yellow Brick Home.

11. If you don’t want to spend a ton of money on an outdoor table, you can build your own, from Decor and the Dog.

If you don't want to spend a ton of money on an outdoor table, you can build your own, from Decor and the Dog.

12. Give life to your old outdoor chairs with some paint, from A Pretty Life in the Suburbs.

Give life to your old outdoor chairs with some paint, from A Pretty Life in the Suburbs.

Are you ready for your summer party?

- Chelsey, The Paper Mama

Maximising the kitchen corner cabinet (without that spinning thing!) By: Jules IKEAHacker

kitchen corner cabinet1a

kitchen corner cabinet 2a

So many kitchens have the infamous corner cabinet from IKEA. And anyone who has had this cabinet either loves it or hates it. Personally when I had this cabinet in our first kitchen I hated it, the spinning shelf thing wasted space and was noisy.

As we constructed our second IKEA kitchen I was bummed we had to get the corner cabinet again. But we turned lemons into some sweet lemonade!!!!!!

All you need is the cabinet, which is surprisingly cheap when not purchased with the corner base cabinet carousel.

(5) drawer slides from the hardware store

(2) left over shelves

kitchen corner cabinet5

kitchen corner cabinet4

kitchen corner cabinet3

And a packet of the removable 3m hooks.

I am SSSOOOO proud of my husband taking my ideas sketched out on paper and bringing them to life.

~ Shawna

The post Maximising the kitchen corner cabinet (without that spinning thing!) appeared first on IKEA Hackers.


via IKEA Hackers http://ift.tt/1GBTLup From Jules IKEAHacker

Thursday, June 11, 2015

UHeart Organizing: A Party in the Pantry! From noreply@blogger.com (Jennifer Jones)

Today's Inspiration comes from guest blogger noreply@blogger.com (Jennifer Jones) Be sure to check out their blog! Today's post is another fab example of how changes in schedules and seasons can cause major organizational updates.

Cassie, of Hi Sugarplum, has been writing for me for quite awhile now and I always appreciate that she finds ways to make me laugh, feel inspired and ready to make something with tassels.  She is one stylish chic in all areas of her life; everything from the home she is decorating to her daily wears.  Speaking of!  She is working on a blank slate of a house which means all sorts of pretty organizing.  And today she is here to share how the recent onset of summer has driven her to whip her pantry into shape.  Are any of you working on your pantry as part of this week's organizational challenge?  If so, be ready for some ideas and eye candy to keep you motivated!


Hello iHeart friends! I'm thrilled to be back on Jen's rockstar blog sharing my latest organized space. I had the honor of participating in the {One Room Challenge} with her, and am still blown away by their Living Room! And don't get me started on her Kitchen. We have girl-time planned for next month, and I can't wait to see her cute face.

School's out in our neck of the woods, which means it's officially Summer. Which also means our house is a revolving door of hungry kids, constantly hitting up the pantry for snacks. It only took a few days before I realized I needed a better system...for both me when trying to put together a meal, and for the all-day snackers!


That's the After...you don't want to see the Before! Which is crazy because we've only lived in this house a few months! But it just proves that without a good system, a space will become prime clutter-zone in no time!

I began like I do every organizing project...emptied everything out, got rid of the junk hiding in the back, and started with a clean slate. I thought about lining the shelves or the back with cute paper...but decided to keep it simple since food packages are so busy. And honestly, I just wanted this done before the next wave of kids stopped by!


Just like our last house's pantry, I used Ikea and Dollar Store bins and canisters to group like items. I've found they keep items from getting lost in the back, and overlooked, especially once they've been opened. It also helps me shop because I can quickly check each category and see what needs replenishing. At the same time, it keeps me from overspending because I only shop for what fits in each bin! #sneaky


The bottom shelves hold the foods the kids reach for most often...cereal, crackers, and snack bars. Labels in my treasured bookplates make finding things easily.

Sidenote: Can we pause a moment to mourn the discontinuation of these Martha Stewart bookplates?! What are she and Staples thinking no longer selling them?!? #asyouwere


Removing individually-wrapped foods from their packages saves a ton of space in bins. And saves you from finding the inevitably empty carton still on the shelf!


A long tiered rack makes the cans and bottles easily seen and accessible.


The higher shelves hold items I use for most meal prep...pasta, rice, baking supplies.


Items that require measuring are stored in air-tight canisters. And I recommend labeling them unless you're absolutely sure you can tell the difference between flour and powdered sugar. #oops

Tip: Flour and sugar packages are rarely the same size as my canisters, so I store the leftover in ziplock bags in the separate bins on the top shelf.


Don't overlook vertical space....the side of the cabinet is a great spot for baskets holding small packets.


We have a hard-core Crystal Light addiction...yes I'm aware our insides are probably the color of Red Dye #9. #dontjudge


The bins at the very top hold extras of the items I buy in bulk. The kids aren't allowed to get a new box of cereal down until one has been emptied! #momlaw


Now I'm ready to face the Summer snackers! What spaces do you need to tackle before the kids descend? You can see more of my organized spaces here, and the rooms we've decorated in the new house here and here. Happy organizing, lovebugs!


 "Hi, I'm Cassie, a DIY and design-obsessed Texas girl, and lover of travel, fashion, sarcasm and Mexican food. When I'm not hanging with my sweet and funny family, you can find me kicking the '80s out of our home, one budget project at a time, on my blog Hi Sugarplum!