Thursday, September 11, 2014

Kura transformed into Bed / Play Structure combo By: Eric Strong

kura bed 3


Materials: BESTA, KURA, TROFAST


My son needed to give up his convertible toddler bed for his little sister, but would only do so if provided the “most awesome bed ever” in exchange. I decided to attempt my first IKEA hack by transforming a Kura bed into something personal and fun. He enjoys playground slides, simple machines, kinetic ball sculptures/marble runs, and exploring/hiding in general. I put all those ideas together:


1. Assembled the Kura largely as designed, in the loft orientation.

2. Attached the 3 tiered Trofast storage system along the side of the Kura.

3. Attached a piece of whiteboard to the top of the Trofast to use as a slide. (The slide surface ended up being a little too fast and too easily scratched. I may need to replace it with a different material in the near future.)

4. Connecting the top of the slide to the bed as a separate platform component. The platform has 2 major features:

a. A crane and pulley, to which is attached a bucket. The crane rotates around its long axis.

b. A simple and hidden ball run which accommodates golf balls. A simple internal mechanism holds on to any balls dropped inside until 6 are collected together, and then it dumps them all at once, back into the bucket at the bottom.


ball run

kura bed 4


5. Covered the empty space under the bed with lightweight wood paneling fixed to medium density fibreboard (mdf).

6. As a separate component, attached a pivoting axel to the side of a small Besta wall shelving unit, which was then set within a rigid, mini door frame. The swinging Besta was then used as a door into the space under the Kura, which is now transformed into a secret room.

7. A locking mechanism for the Besta door utilizing a fake book was included, to add to the secret door effect.


secret door

secret door 2

kura bed 2


8. A backup, one-way escape hatch from the secret room was created, in the event the Besta door mechanism fails with someone inside. The hatch opens up behind the Trofast bins.

9. A 2nd Kura bed was purchased to use for spare parts, in order to make sure all components of the bed matched. Almost every piece of the 2nd bed was used somehow:

a. Main support beams used to create the platform, crane, and support structure for the secret room.

b. Wooden slats used for the platform floor and rails for the slide (among other places)

c. Mdf used for attachment of the wood paneling

10. The externally visible mdf was covered in dark blue contact paper. The Besta door/bookcase and slide rails were painted to match.


Please view my 8 min video outlining the design and construction of this hack below or via this link.


via IKEA Hackers http://ift.tt/1srvBti From Eric Strong

Wednesday, September 10, 2014

DIY Embossed Cards By: Grace Bonney

ericapretty

I always think of embossed cards as the little black dress of stationery. A simple embossed card always feels in style and detailed enough to be interesting but isn’t so in your face with decorative details that the message is lost in the design. I’ve always wanted to know how to make my own embossed cards, so Erica Loesing of Yes Ma’am came to my rescue! In this tutorial, she will walk you through the step-by-step process of creating your own embossed cards. Her process photos are incredibly detailed and easy to follow, so I hope this will inspire all of you to give it a shot with something simple, like this heart design Erica created. I’ve always wanted to do a simple square monogram of my family’s initials (G for me, J for Julia, H for Hope and T for Turk) so I think I’ve got this weekend’s project all lined up. Thanks so much to Erica for sharing this project with us and stay tuned for more DIYs from Erica to come soon! xo, grace


006 005 001 002 029

Click through for the full how-to after the jump!


(more…)


via Design*Sponge http://ift.tt/WUuJ3U From Grace Bonney

PS Tray makes handy Espresso helper By: Sammy

utensilio


Materials: IKEA PS 2014


From the tray of the new IKEA PS collection I made a small rack for my Espresso capsules and accessories. I took two 3 cm deep wooden slats sawed from the hardware store and fastened them to the tray with nails. The background I have partially painted white.


via IKEA Hackers http://ift.tt/1tKD9cq From Sammy

Tuesday, September 9, 2014

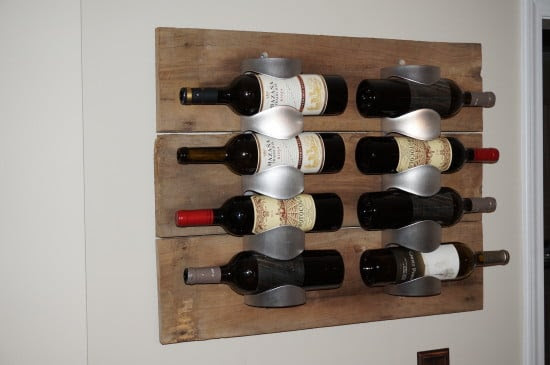
Vurm Wine Racks with Antique Barn Wood By: SageFiv

Antique barn wood gave me the look I wanted


Materials: VURM wine rack


$20 at Ikea, $20 at an antique store and $10 at the hardware store gave me exactly what I wanted!


via IKEA Hackers http://ift.tt/1scXq8p From SageFiv

Mid Century Modern Record Console By: David K

149412-9109423-frontoncredenza_png


Materials: BESTÃ… shelf/height extension unit


Starting with a BESTÃ… shelf/height extension unit I moved the center divider to the left to accommodate more space for my records and to fit my receiver perfectly. I then cut one shelf down to fit and did not use the other. Instead of using the top I replaced it with some Ipe (a brazilian hardwood) that I made at a local woodshop. I then added some hairpin legs I had from another project.


149412-9109422-credenza-right-angle_png


via IKEA Hackers http://ift.tt/WE076z From David K

24 Hours in Scarborough, England By: Stephanie

24_hours_scarborough

Up in the Yorkshire area of England sits the coastal city of Scarborough and the talented local illustration duo of Buttercrumble, Chloe and Abigail. This seaside locale boasts quaint coffee shops, bakeries, theaters and more of which Abigail shares with us today. Take a tour of this northern England town and we hope you’ll stop by to say hi to Chloe and Abigail, too. -Stephanie


24 Hours is Scarborough 24 Hours is Scarborough 24 Hours is Scarborough 05 10

Read the full guide after the jump…


(more…)


via Design*Sponge http://ift.tt/WMwJLy From Stephanie

Monday, September 8, 2014

How to use Godmorgon cabs with non-Ikea wash basins By: VauWeh

GMReady sink1 sink2


Godmorgon and no-Ikea wash basins


At first glance it seems a normal Godmorgon-cabinet. At second glance you notice the basin. It is NOT from Ikea – and there are problems. Ikea uses a special basin design, which are situated on top of the cabinet and water drain is next to the wall, but in most houses you can find another type, the basin is fixed to the wall and the drain exits the basin in the middle. So Godmorgons drawer collides with the tube.


The basin of the house has to be rectangular, many of modern ones are like this. When you buy a Godmorgon it is important that it is more narrow than the basin, and the depth of the basin must be a little more than Godmorgons 48 cm. It is easy to cut out a rectangular hole in the drawer, even the railing can be used. I fastened the cabinet to the wall, and let a gap of about 2cm between Godmorgon and basin.


It worked great.


via IKEA Hackers http://ift.tt/WH10vn From VauWeh

Laid-back family life in the Australian countryside By: shannon

DesignSponge Sneak Peeks


Jessica Tremp and Michael Madden have only lived in their home for a few short months, but they have quickly settled into the rhythm of quiet country living, along with their son, Syd and dog, Soda. Located in the Macedon Ranges of Australia, they love cooking at home, whether it be lingering over pancakes on weekend mornings or cooking Italian dishes for the neighbors. Their approach to decorating is equally laid-back, as they have filled the airy, white washed space with Mid-Century furniture, paintings by Jessica’s father and a growing collection of handmade ceramics. Though many meaningful objects fill their home, nothing seems too precious and in fact, the space is markedly kid friendly. Even two-year-old Syd helped decorate his playful, polka dotted bedroom. Jessica is a photographer, spending her days capturing people tying the knot and during the quieter months shooting more personal work, as she describes: creating images for the things she can’t always find words for. Thank you Jessica, Michael, Syd and Soda and special thanks to Tara Pearce for the stunning photos! -Shannon


Image above: “The kitchen is probably where we spend the most time,” Jessica says. “It’s always beautifully sunny with big glass doors that lead outside. Though I’m not normally a huge fan of marble, we opted for a round marble tulip table as there was already a lot of wood going on in the house/room. It’s a replica of a timeless Mid-Century design by Saarinen. The Farstrup chairs are one of my favourite pieces of furniture and fit perfectly around the table. I love plants and there’s definitely a growing number of these in our home.”


DesignSponge Sneak Peeks

Image above: “We wanted Syd’s room to feel really happy and bright. The colored spots are an afternoon project he helped with. The little beehive lamp is a lucky garage sale score and that is Michael’s old scouts’ blanket hanging over the cot.”


DesignSponge Sneak Peeks


DesignSponge Sneak Peeks DesignSponge Sneak Peeks DesignSponge Sneak Peeks DesignSponge Sneak Peeks DesignSponge Sneak Peeks DesignSponge Sneak Peeks DesignSponge Sneak Peeks DesignSponge Sneak Peeks DesignSponge Sneak Peeks DesignSponge Sneak Peeks DesignSponge Sneak Peeks DesignSponge Sneak Peeks DesignSponge Sneak Peeks DesignSponge Sneak Peeks DesignSponge Sneak Peeks DesignSponge Sneak Peeks DesignSponge Sneak Peeks DesignSponge Sneak Peeks

See more of this Australian home after the jump…


(more…)


via Design*Sponge http://ift.tt/WGK2xh From shannon