Thursday, October 10, 2013

3-seater Tullerö By: Jules IKEAHacker

seater2


Materials: 1 x Tullerö, 2 x VYSSA Slappna (160×60), IKEA textile of your choice, scissor, staplemachine, sharp knife, spray-glue, screws and a saw.


Description: Tired of the two-seater, 2 chairs and table? Need more space? The pillows are a hassle? Do like I did – make a padded 3-seater and cut the size of the table.


I needed a smaller table so I cut off the outer bars on each side of the table and stained the cuts to hide the cut.


seater1


3-seater:


Start by cutting off the handles on the two-seater and one of the chairs (so you can place them together.)


Take some screws and screw them in the legs in the front and back (I used a total of 8 screws).


From the second chair, take 3 of the back “plates” and screw these on under the lowest “plates” on the 3-seater and chair. So the mattress will not fall out.


Take your VYSSA mattress and cut them to fit (the length of 160 is perfect, you just need to cut the depth) I cut one to 47 cm (seating) and the other to 42,5 (back).


Place the mattress on the seating first, spraying glue between the mattress and seating. Lay your textile over, wrap it under the edge and start stapling. Be careful around the edges to get a smooth edge.


When done with the seating, do the same with the back.


The rest of the second chair I took apart and kept in case I needed some parts for later mods on the 3-seater :)


~ Roger, Norway


via IKEA Hackers http://feedproxy.google.com/~r/Ikeahacker/~3/ShrQePwyPKg/3-seater-tullero.html From Jules IKEAHacker

Wednesday, October 9, 2013

From kitchen to shoe storage By: Jules IKEAHacker

shoe2


Materials: Faktum, Trofast


Description: After searching for a neat shoe-rack months we finally decided that IKEA is not able to provide what we want.


Since our whole flat looks like a IKEA showroom and we are convinced with the cost-benefit ratio we thought of giving the horizontal Faktum cabinets a try.


shoe1

shoe3

shoe4

shoe5


Not only these three cabinets provide plenty of space for our shoes. We also added some hooks under the countertop to hang our jackets. Under the bottommost Faktum we furthermore added some aluminium profiles, so we can attach 2 Trofast Boxes for gloves and scarfs.


Of course the lowest door is custom painted to match the room (not visible in photo).


Have fun!


~ Markus, Austria


via IKEA Hackers http://feedproxy.google.com/~r/Ikeahacker/~3/6RthPCYodhA/from-kitchen-to-shoe-storage.html From Jules IKEAHacker

Lack Hat Stand By: Jules IKEAHacker

lackhat2


Materials: Lack end table, Besta legs, drill, adhesive, 1/4 inch lag screw with fender washer, 2 packages each of Blecka and Bjarnum hooks


Description: None of the standard Ikea hat stands are in the beech color that is the primary finish in this room so one was created using a single Lack end table.


1. Because the center of the Lack table is hollow it is necessary to through bolt it and have a fender washer to distribute the load on the back side.


lackhat1


2. Besta legs will work fine on a Lack table if you enlarge the hole just a little.


3. The Lack table legs are screwed together using the normal hardware and a little mastic. The Bjarnum hooks are screwed in pairs on opposite sides of the post spanning the connection between the leg parts to give extra strength to the otherwise slightly wobbly connection.


~ Daniel Nolte


via IKEA Hackers http://feedproxy.google.com/~r/Ikeahacker/~3/nCP_A9tNpeg/lack-hat-stand.html From Jules IKEAHacker

Tuesday, October 8, 2013

Fan”Tarva”lous By: Danny Smith

Dresser2


Materials: TARVA


Description: Tarva dresser painted in a fantastic way.


Dresser3 Dresser5 Dresser4 Dresser1


via IKEA Hackers http://feedproxy.google.com/~r/Ikeahacker/~3/0qgXqae2umI/fantarvalous.html From Danny Smith

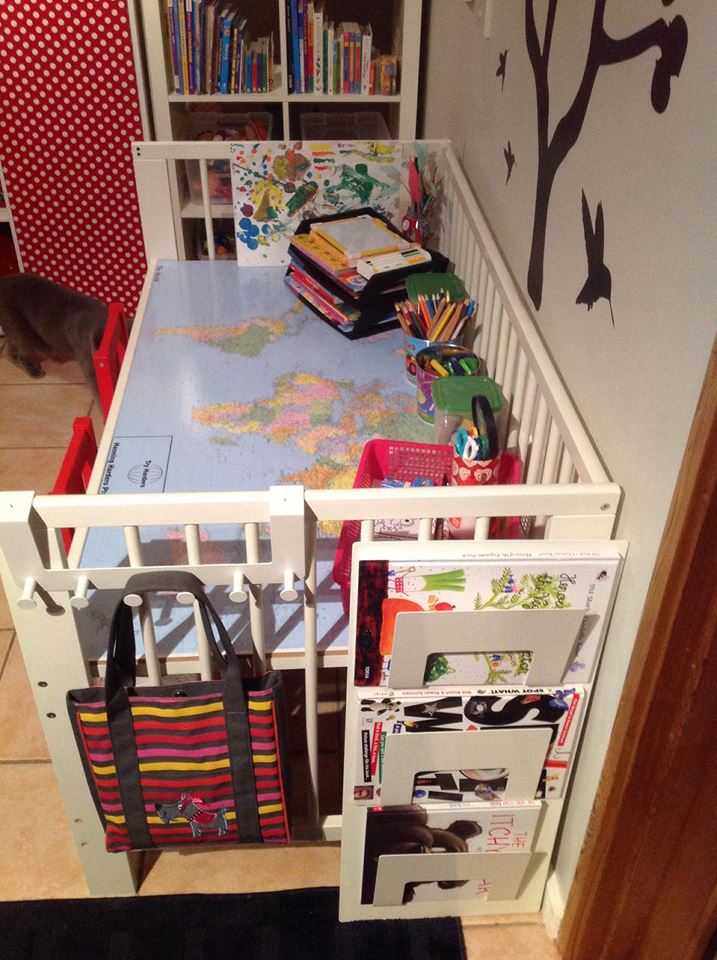
Kids’ Art/Craft/Homework Table from IKEA Gulliver Cot By: Shudie

IKEA kids side


Materials: Gulliver


Description:

1. Gulliver Cot: Adjusted the height of the cross bar by drilling mounting holes at appropriate height

2. Screw L brackets on each corner and middle of cross bar

3. Mounted desk support bar onto cot vertical rods using screws

4. Covered base of Gulliver cot/ desk with vinyl map: used spray glue and staple gun

5. Attach IKEA Spontan Newspaper rack to vertical rods with screws

6. To decorate:

- Enudden hanger for door to hang school bag

- Herrup navy blue floor rug

- Red Sundvik children’s chairs

- IKEA Xmas love heart wrapping paper to cover pencil pot

- Mala easel behind desk

- Expedit 2x 4

- IKEA children’s book ‘Heroes of the vegetable patch’ in mag rack

- Mala whiteboard pens

- Pruta set of 17 food containers for art craft supplies

- Skurar plant pot for waste bin

- Spontan newspaper rack


via IKEA Hackers http://feedproxy.google.com/~r/Ikeahacker/~3/_uOi2uyM8Ak/kids-artcrafthomework-table-from-ikea-gulliver-cot.html From Shudie

Monday, October 7, 2013

Tundra on the Ceiling! By: Jules IKEAHacker

tundra3


Materials: Tundra Laminate Flooring, 2.5 inch Finishing Nail Gun (rent), Ladders, Extra Helpers, Table Saw, Color Match Filler Paste for minor flaws, Tolerance for Minor Flaws


Description: The original plan was to use a finishing nail gun to use T&G bamboo flooring as a unique green ceiling. Tundra flooring was nearly half the price so thus a hack was born.


1. This is absolutely a multi-person job, manipulating and nailing large panels above your head.


2. Find and mark the joists! You do not want to be anchoring anything to just the drywall! Tundra panels are wide enough so that if you are installing perpendicular to the joists each panel will hit at least two joists. Put two nails in each of them.


tundra1


tundra2


3. Because you are nailing it down this is not going to be a ‘floating’ installation. It will flex to the underlying ceiling. Thus it will be essentially impossible to get that nice ‘click’ that snugs the panels tightly together. Frustration with this gave rise to:


—The hack within the hack: Converting Tundra to No-click Tongue and Groove panels–


The panels were trimmed on the long edge so that the little bump on the tab was removed but a little of the tab remained. On the short edge the bump was removed with a utility knife.


4. Even with the click removed a perfect fit was not possible so wood putty was needed to fill the resulting cracks. Fortunately since this is not going to be walked on and not viewed up close this does not represent a major problem unless you are bothered by things being not perfect.


~ Daniel Nolte


via IKEA Hackers http://feedproxy.google.com/~r/Ikeahacker/~3/TYrCL9qPpCs/tundra-on-the-ceiling.html From Jules IKEAHacker

Triangular Lack Side Tables with Malm Bed and Integrated Dioder Lights By: Jules IKEAHacker

bedside1


Materials: Lack end tables, Dioder strip light, table saw, toggle switch


Description: The Malm Bed in this room had been placed on a diagonal. Leaving a couple of triangular spaces where end tables would be.


In addition it was wanted to have the side tables to look a bit more built-in to the bed.


Finally there was a thought to have built-in LED light strips along the underside of the bed. However we wanted to have a conveniently located switch so that they could be easily turned on, for example, when needing to go to the bathroom during the night.


1. Trim off unwanted corner of Lack table top.


2. Trim two legs of each table to the height of the Malm Side rail, using the bed itself as a guide.


3. If there is a concern with the short legs sliding off of the Malm side rail partially put a screw in the side rail. Remember that once sawed the leg will be a hollow tube.


bedside2


4. Install the toggle switch and use part of the sawed off table leg to fill in the triangular shape between the headboard and wall. Note that by doing the lights this way only one dioder transformer was needed for both sides of the bed and the switches were on the low voltage side, reducing shorting and insulation worries inside the table.


~ Daniel Nolte


via IKEA Hackers http://feedproxy.google.com/~r/Ikeahacker/~3/qn4othHPmVE/triangular-lack-side-tables-with-malm-bed-and-integrated-dioder-lights.html From Jules IKEAHacker

My First Ikea Hack By: Beyond The Picket Fence

IMG_1599


Description: I created my first IKEA hack using what I think was an upper shelf piece from a desk. I created a bench by adding some reclaimed flooring for a back to sturdy it up. Some paint and home stenciled on it completed this piece for a great entry bench.


IMG_1494 IMG_1501 IMG_1590


See more of the entry bench.


via IKEA Hackers http://feedproxy.google.com/~r/Ikeahacker/~3/BZGJJ5AcYWc/my-first-ikea-hack.html From Beyond The Picket Fence