Monday, September 16, 2013

A Blanda Blank flying saucer lamp By: Eli

DSCN1280


Materials:

- 2 Blanda blanks bowls (20cm and 28cm)


- the inners of a Mosby lampshade


- Fixa tool


- ribs of a broken umbrella, metal wire


- gold spray paint


- a stainless steel pendulum I had around (I think it was from Ikea but it seems to be discontinued)


Description:

Inspired by some other Blanda lampshade hacks, I decided to try an oversize version of the “flowerpot” lamp, but with the twist that I cannibalized the metal entrails of a Mosby lampshade (18 cm wide) to hang the 20cm Blanda in the 28cm Blanda. The Blanda bowls have flat bottoms so I dished out the smaller bowl a bit to make it round. I drilled three holes along the rim to connect to the frame constructed from the Mosby and three spars of a broken umbrella someone threw away (recycle! save the planet!)


DSCN1270 DSCN1273


I used the Fixa tool for making holes in kitchen sinks to make a hole for the pendulum in the larger bowl, I also drilled 12 holes in a circle in the top for airflow and to project some interesting light patterns on the ceiling. I sprayed the inside of the large bowl with gold paint to add some visual interest and give the light a warmer color. I used a LED lamp to eliminate any concerns about heat. I also polished the smaller bowl a bit.


via IKEA Hackers http://feedproxy.google.com/~r/Ikeahacker/~3/vr21SEFBBZc/a-blanda-blank-flying-saucer-lamp.html From Eli

Every women´s dream shoe cupboard By: Evelin and Bernhard

Foto 3


Material:


Expedit (701.937.45)

Expedit insert with glass door(501.717.54) x8

Dioder (601.165.40) x2


Description:

What can I say, it is every women’s dream that my beloved husband realized it for me.

We started with the Expedit, second step were the inserts and last but not least the Dioder (first fixing the lighting strip and then pushing the cable through the back part of the inserts. Sounds easy and it was easy… you need just a little bit of patience..


via IKEA Hackers http://feedproxy.google.com/~r/Ikeahacker/~3/TSOdDOP76hM/every-womens-dream-shoe-cupboard.html From Evelin and Bernhard

Friday, September 13, 2013

Add a Keyboard Tray to a Besta Desk By: Bill Hutchison

SAMSUNG


Materials: Besta


Description: After trying two different keyboard trays for my new Ikea Besta desk, with no success, I finally decided that I needed to build my own.


The space between the two end panels of the desk isn’t too long, so I ended up purchasing a couple of drawer slides and a white shelf from the local hardware store and mounted it in the already existing holes on the desk sides.


BESTA desk with keyboard tray SAMSUNG


Worked out pretty well for under $20!


You can see the step by step instructions on how I built this on my web-site.


via IKEA Hackers http://feedproxy.google.com/~r/Ikeahacker/~3/NO9kfA_nbv4/add-a-keyboard-tray-to-a-besta-desk.html From Bill Hutchison

Faktum Chinese Styled Shoe Cabinet By: Yap Wai Hoong

IMG_20130909_181503


Materials: Faktum


Description: Finally we are having a proper shoe cabinet to hide away shoes – after living in this home for some 9 years.


Bought 2 units of Ikea Kitchen wall cabinet, fastened them together side to side. Got myself 6 solid wood cabinet feet and mounted on the base of cabinet.


I painted on the interior side of the backboard turquoise, just to give it a bit of a surprise within – and keeping loud colours subtle.


Then I bought 2 units of these Chinese Brassplates from Internet and mounted them on the cabinet doors to serve as door pulls.


The result is kind of a modern cabinet with a little vintage feel to it.


via IKEA Hackers http://feedproxy.google.com/~r/Ikeahacker/~3/LlzdqoYGoXE/faktum-chinese-styled-shoe-cabinet.html From Yap Wai Hoong

Under Sink Hanging Rail for Cleaning Stuffs By: anhnguyen81

20130911-132341.jpg


Material: Bygel rail, Grundtal


Description: Affix a Bygel rail into the insides of your cabinet to hook up your bottles by the handle.


via IKEA Hackers http://feedproxy.google.com/~r/Ikeahacker/~3/gYdwBMz0Ahk/under-sink-hanging-rail-for-cleaning-stuffs.html From anhnguyen81

Thursday, September 12, 2013

Banner for a birthday party By: Jules IKEAHacker

2013-08-25-140805


Materials: SKÖTSEL coaster


Description: My three year old requested a pirate themed birthday bash, but as he is only three I did not think that a lot of scull and bones were the right way to go.


So I decided to incorporate a lot of color with paper lantern and such. On a visit to Ikea I saw the SKÖTSEL coaster and an idea was born.


I printed out letters, placed them on top of the coaster and traced through, and then filled in the letter with a permanent marker. I cut some canvas into flags and then after cutting a hole on the Skötsel, tied the two together.


2013-08-25-140721

2013-08-25-140808

2013-08-25-150134

Starred Photos195


Outcome – Birthday banner :)


I also cut up the MARIT table runner to make an up an “island”, using the DITTE fabric as the “sea”. REKO glasses were decorated with tabe ;)


See more of the coaster banner.


~ Soffia Gardarsdottir, Iceland


via IKEA Hackers http://feedproxy.google.com/~r/Ikeahacker/~3/Nt30xCHOvzs/banner-for-a-birthday-party.html From Jules IKEAHacker

Bed Frame with Lots of Storage By: Jules IKEAHacker

8


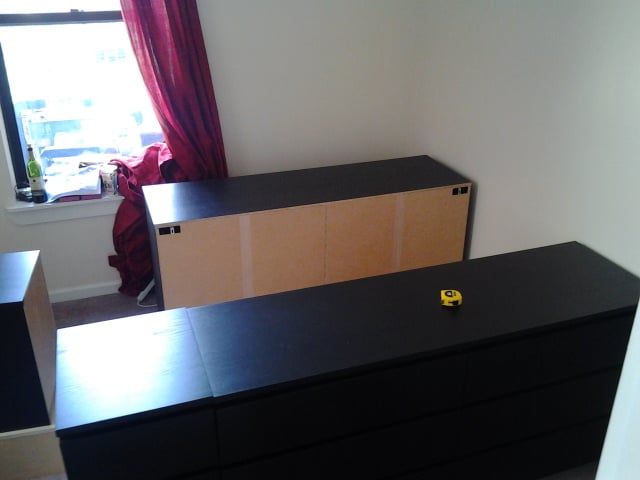
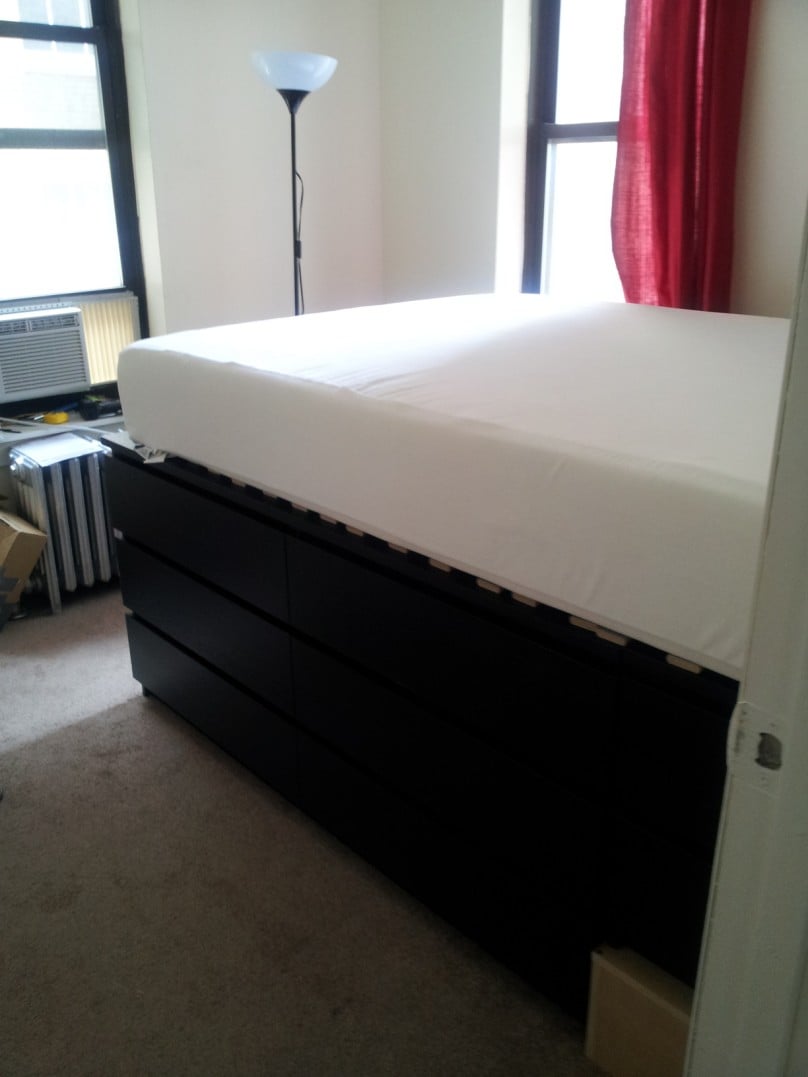
Materials: 2 Malm 6-Drawer Dressers, 2 Malm 2-drawer chests, two boxes built out of MDF measuring 16x9x19 inches, 1 Sultan Luroy Bed Slats (Full size), 1 Full size mattress


Description: My girlfriend recently moved into a New York City apartment, and our bedroom is very small. There is no closet, and our spacing options were limited because of a radiator, the entrance, and a door to the bathroom. We both needed chests of drawers and night stands, but didn’t want to sacrifice all of our free space. This is what we came up with to save space – we turned our dressers and night stands into our bed frame. By maximizing our space vertically, we now easily fit all of our stuf f into our bedroom, and also have a very comfortable sleeping arrangement. Plus, we also have a storage space under the mattress between the chests of drawers. Aside from the little hop that it takes to get into bed, this is the ideal set up.


1


2a


4a 6a


Directions:

The combined length of a malm 6-drawer dresser, lined up with a malm 2-drawer chest matches perfectly with the length of a full size mattress. Just build the box out of MDF to the dimensions specified above (to lift up the 2-drawer chest to the height of the dresser) and you’re more than half way there.


Lay the slats across the dressers so that the space in the middle is covered. They lay your mattress over the slats. I bolted some of the slats (every third one)down to the dresser so they would not slide around


Screw it all together. The dressers to the MDF boxes, and the dressers to the night stands.


I built a head board and attached it too, but this is a different project and doesn’t involve ikea products. Still, if this is something you are interested in, you should bolt it down under the slats.


~ Michael, New York City


via IKEA Hackers http://feedproxy.google.com/~r/Ikeahacker/~3/YGBmv1hSB0k/bed-frame-with-lots-of-storage.html From Jules IKEAHacker

Wednesday, September 11, 2013

A rack on a Laiva desk By: Jules IKEAHacker

Bureau-Aliénor-Ikéa-Laiva-600x600


Materials: Laiva desk, Sultan Lade slatted bed-base, saw, nail and hammer


Description: My daughter has a Laiva desk but she doesn’t need the cable organizer and very often her pen rolls into it …


So I decided to build a rack for her.


It was easy because the Sultan Lade slats were as large as the desk.


First of all, I separated the slats, pulling off the ribbon.


I cut two slats into 13,5 centimeter pieces.


I nailed two times two slats together with those little pieces, so the rack is deep enough.


I nailed two times two slats (28cm).


Then I fixed together the frame of the rack, nailing all together.


I cut 4cm from two new slats, I fixed them together with a 13.5 cm piece. I fixed this “set” to the rack and added a little 13,8cm piece to create a little case.


I painted the finished rack in pink, because my daughter loves this color…


I cut 2 10cm pieces and I painted them to.


I fixed this piece at the edge of the cable organizer and then fixed the rack in the middle, nailing it.


With the same idea, I did a rack for another daughter with 4 slats of 1m long and 10cm large (It’s the purple one).


Bureau-Coraline-Laiva-Ikéa-600x600

Bureau-Ikéa-Laiva-table-à-couture-600x600


With the same idea, I did a rack for my sewing machine, with the rest of the slatted bed-base.


See more of the Laiva hack.


~ Gwendoline, Suisse


via IKEA Hackers http://feedproxy.google.com/~r/Ikeahacker/~3/tLR5xzycJz4/a-rack-on-a-laiva-desk.html From Jules IKEAHacker