Thursday, November 14, 2013

TRENDIG Wall Clock By: Tira-Mi-Su

DIY-Wanduhr (selfmade wall clock) aus IKEA TRENDIG 2013 Schüssel (rosa)


Materials: TRENDIG


Description: Here comes a (comparatively) small IKEA Hack.

I converted my new pink shallow bowl named TRENDIG: it’s a wall clock now.

Might be nothing exceptional, but I kinda like it.


Almost every shallow plate or other round and flat objects (even records) can be transformed into a wall clock.

You should definitely try to create your own one someday :)


More information about the hack here (German).


DIY-Wanduhr IKEA Trendig 2013 (step-by-step)


via IKEA Hackers http://www.ikeahackers.net/2013/11/trendig-wall-clock.html From Tira-Mi-Su

KNUFF Cabinet Door Bins By: David Saxton

IMG_1193


Materials: KNUFF magazine holder


Description: We were tired of having our bottles cooking oils, vinegars, etc. up on the counter-top where they were occupying valuable prep space, so I took a set of KNUFF Magazine Files that I had laying around and made them into bins to hold the bottles. They’re screwed into the back of the cabinet doors adjacent to the stove for easy access.


IMG_1195


IMG_1194


IMG_1196


I sawed about half-way around so that they would be lower in the front (for easier access to their contents). I also added the (odd-sized due to some trial-and-error with my drill bits) holes in the front partly for airflow and style but mainly so that I could get a driver in there to screw the bins onto the back of the cabinet doors. I mounted them high on the doors for easier reach and also so they would impact the space inside of the cabinets less. I finished them minimally with Varathane.


I realize that there are plenty of ready-made options for this same purpose, but I couldn’t bring myself to buy something when I knew that I had these surplus parts. Plus, I like the personal touch and the look of the dovetailed plywood, something that is difficult to find off-the-shelf.


via IKEA Hackers http://www.ikeahackers.net/2013/11/knuff-cabinet-door-bins-4.html From David Saxton

IKEA Faktum Hacks By: AdamK

vorschau


3x IKEA Faktum pimped up!!


Please look at my YouTube Video to see more:


via IKEA Hackers http://feedproxy.google.com/~r/Ikeahacker/~3/AFWzMjCZaRo/ikea-faktum-hacks.html From AdamK

Wednesday, November 13, 2013

Hardware, the Footboard and a Shrinking Mattress From House of Smiths

Today's Inspiration comes from guest blogger House of Smiths Be sure to check out their blog! Remember those gorgeous clear, sleek handles that we ordered from Restoration Hardware?


Well, after rigging up a crazy, scrapbooking paper template/guide to install each piece, we finally got them all settled in on our master bedroom built-in, and we're lovin' 'em!


PS: Drilling into cabinets or furniture to make room for new hardware always makes me have a mini heart attack. Ahhhh! Anyone else?


READ THE REST OF THIS POST >>>

Design hanging planters By: Jules IKEAHacker

Ikea-planters-1-796509


Materials: Asker container & Ikea plants


Description: On a design website I saw these amazing hanging planters, but at $100 a piece they were way too expensive. So when I visited Ikea and saw the Asker container I knew what I had to do.


Materials:

- Asker containers (they two sizes, choose the one you like, although the bigger size fits larger plants)

- Any plant that fits into a small pot. Ikea has a variety of good sized plants.

- Thrift store leather belts in varying colors (mine were 50 cents a piece)


Ikea-planters-2-799881

Ikea-planters-3-704875

Ikea-planters-4-708187


Instructions:

- Put the plant in the Asker container

- Feed the belt through the hole

- Put a nail in the wall

- Hang the planter in your kitchen, bedroom, bathroom or study.


Note: The big Asker containers have a hole in the bottom, so I taped it with duct tape from the inside out to prevent leaking when I water the plants.


They actually look better than the design planters I saw!


~ Liesbeth Smit, Amsterdam


via IKEA Hackers http://feedproxy.google.com/~r/Ikeahacker/~3/ipLDzpNEByI/design-hanging-planters.html From Jules IKEAHacker

Put together a Stolmen 165×215 cm bed with storage By: Jules IKEAHacker

stolmenbed


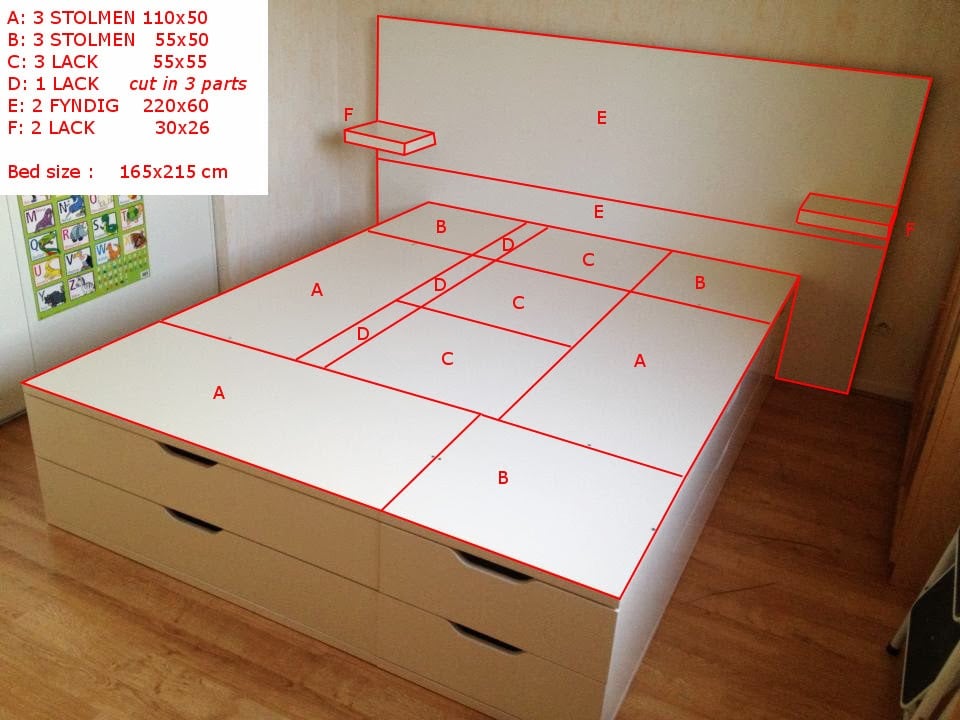
Materials: Stolmen, Lack, Fyndig


Description: We wanted a bed with a lot of storage.


We achieve it with :

- 3x STOLMEN 110×50 cm

- 3x STOLMEN 55×50 cm

- 3x LACK 55×55 cm

- 1 LACK 55×55 (cut in 3 parts)

- 2 FYNDIG 220×60

- 2 LACK 30×26


FYNDIG are fixed together with metal bars, screws …


The image is self-explanable.


It tooks about 5h for me to put together all these products.

Count about 30 min for each STOLMEN.

I spent 45 min to cut and assemble the LACK (D on the picture)


~ arnapou


via IKEA Hackers http://feedproxy.google.com/~r/Ikeahacker/~3/X13_gQgPtXA/put-together-a-stolmen-165x215-cm-bed-with-storage.html From Jules IKEAHacker

Tuesday, November 12, 2013

GODMORGON small stuff organizer for MALM 6-drawer chest By: Jules IKEAHacker

img_20130808_200926-750326


Materials: GODMORGON Storage unit, set of 3 – MALM 6-drawer chest – SKUBB Box, set of 6, cardboard + double-sided tape


Description: We use the top drawers from our MALM for a lot of small things, e.g. keys, pens etc.

But even the smallest SKUBB boxes are still too big to give you a good overview.

With the GODMORGON units and just a few pieces of cardboard and double-sided tape it makes the perfect organizer for all your small stuff. You can even slide it back and forth over the SKUBB boxes.


img_20130808_200310-741907 img_20130808_200325-738579 img_20130808_200345-745767


Cut the cardboard in pieces of 25mm x 140 mm and put double-sided tape on them. Tape them on the GODMORGON unit.

We used 3 pieces taped together on one side of the GODMORGON and 2 on the other side. How many you need depends on the thickness of the cardboard you use.

Just tape them on and hang the GODMORGON unit on top of your MALM drawer.


~ Sharon


via IKEA Hackers http://feedproxy.google.com/~r/Ikeahacker/~3/HmR__2S3f7o/godmorgon-small-stuff-organizer-for-malm-6-drawer-chest.html From Jules IKEAHacker

Monday, November 11, 2013

Floral Nordmyra Chair Makeover By: Jules IKEAHacker

nordmyra2-733026


Materials: Nordmyra Chair, Fabric, Mod Podge, Scissors, Xacto Knife, Spray Paint


Description: After a while I tend to get bored with the furniture that I have — just like I did with the bland white Nordmyra chair. I’ve had it for a few years and decided that now was the right time to give it a makeover.


nordmyra-728363

Photo: IKEA.com


To start, I took apart the pieces, then spray painted the back/bottom (the outside areas) of the white pieces with Krylon Pumpkin Orange spray paint. I chose to leave the original wood colored leg pieces alone.


nordmyra3-730272


I used the pieces as a general side guide to cut a slightly larger piece of fabric for each of the pieces.


Then, I spread a layer of matte mod podge on each remaining white surface using a sponge brush (the interior areas, the part that will touch you when you sit on the chair) and spread the fabric over it, pressing down and smoothing out any bumps, air bubbles, and imperfections with my hands, then i poured a bit more mod podge on top and used the sponge to spread it over the fabric.


Let them dry overnight, and cut the extra fabric using an Xacto knife, right at the edge of the pieces. Used a bit of medium grain sand paper to sand out any imperfections on the edges, didn’t need much in this case. Then I reattached the pieces, and voila!


~ Erica Baker, Indiana


via IKEA Hackers http://feedproxy.google.com/~r/Ikeahacker/~3/Dp7OSKoS-EY/floral-nordmyra-chair-makeover.html From Jules IKEAHacker

Malm King Bed with Floating Nightstands By: Jules IKEAHacker

malm


Materials: Malm King Bed and 2 Nightstands. Table Saw, Drill Press


Description: We wanted to go to a king bed, but have low windows on either side of the wall. Thanks to careful measuring and a neighbor with good power tools, my husband cut the back piece to the same height as the bed’s side rails, and then drilled new holes to mount the drawer. The nightstand attaches to the bed following the original instructions.


malm2

malm3


~ Anne Prestamo, Tulsa, OK


via IKEA Hackers http://feedproxy.google.com/~r/Ikeahacker/~3/35aTz7nsnhU/malm-king-bed-with-floating-nightstands.html From Jules IKEAHacker