Wednesday, November 13, 2013

Put together a Stolmen 165×215 cm bed with storage By: Jules IKEAHacker

stolmenbed


Materials: Stolmen, Lack, Fyndig


Description: We wanted a bed with a lot of storage.


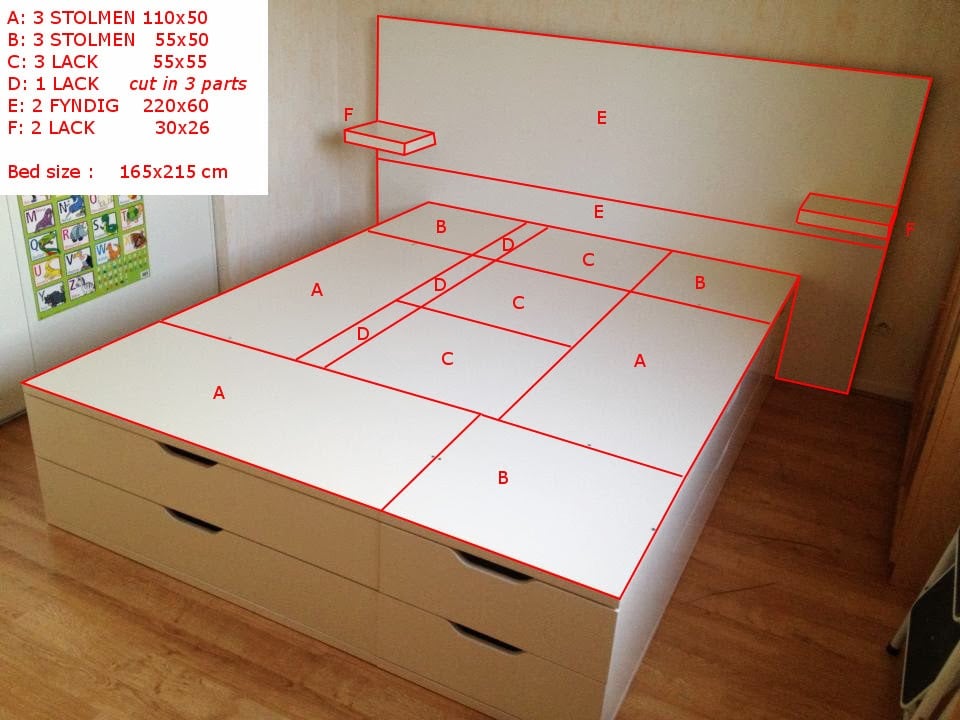
We achieve it with :

- 3x STOLMEN 110×50 cm

- 3x STOLMEN 55×50 cm

- 3x LACK 55×55 cm

- 1 LACK 55×55 (cut in 3 parts)

- 2 FYNDIG 220×60

- 2 LACK 30×26


FYNDIG are fixed together with metal bars, screws …


The image is self-explanable.


It tooks about 5h for me to put together all these products.

Count about 30 min for each STOLMEN.

I spent 45 min to cut and assemble the LACK (D on the picture)


~ arnapou


via IKEA Hackers http://feedproxy.google.com/~r/Ikeahacker/~3/X13_gQgPtXA/put-together-a-stolmen-165x215-cm-bed-with-storage.html From Jules IKEAHacker

Tuesday, November 12, 2013

GODMORGON small stuff organizer for MALM 6-drawer chest By: Jules IKEAHacker

img_20130808_200926-750326


Materials: GODMORGON Storage unit, set of 3 – MALM 6-drawer chest – SKUBB Box, set of 6, cardboard + double-sided tape


Description: We use the top drawers from our MALM for a lot of small things, e.g. keys, pens etc.

But even the smallest SKUBB boxes are still too big to give you a good overview.

With the GODMORGON units and just a few pieces of cardboard and double-sided tape it makes the perfect organizer for all your small stuff. You can even slide it back and forth over the SKUBB boxes.


img_20130808_200310-741907 img_20130808_200325-738579 img_20130808_200345-745767


Cut the cardboard in pieces of 25mm x 140 mm and put double-sided tape on them. Tape them on the GODMORGON unit.

We used 3 pieces taped together on one side of the GODMORGON and 2 on the other side. How many you need depends on the thickness of the cardboard you use.

Just tape them on and hang the GODMORGON unit on top of your MALM drawer.


~ Sharon


via IKEA Hackers http://feedproxy.google.com/~r/Ikeahacker/~3/HmR__2S3f7o/godmorgon-small-stuff-organizer-for-malm-6-drawer-chest.html From Jules IKEAHacker

Monday, November 11, 2013

Floral Nordmyra Chair Makeover By: Jules IKEAHacker

nordmyra2-733026


Materials: Nordmyra Chair, Fabric, Mod Podge, Scissors, Xacto Knife, Spray Paint


Description: After a while I tend to get bored with the furniture that I have — just like I did with the bland white Nordmyra chair. I’ve had it for a few years and decided that now was the right time to give it a makeover.


nordmyra-728363

Photo: IKEA.com


To start, I took apart the pieces, then spray painted the back/bottom (the outside areas) of the white pieces with Krylon Pumpkin Orange spray paint. I chose to leave the original wood colored leg pieces alone.


nordmyra3-730272


I used the pieces as a general side guide to cut a slightly larger piece of fabric for each of the pieces.


Then, I spread a layer of matte mod podge on each remaining white surface using a sponge brush (the interior areas, the part that will touch you when you sit on the chair) and spread the fabric over it, pressing down and smoothing out any bumps, air bubbles, and imperfections with my hands, then i poured a bit more mod podge on top and used the sponge to spread it over the fabric.


Let them dry overnight, and cut the extra fabric using an Xacto knife, right at the edge of the pieces. Used a bit of medium grain sand paper to sand out any imperfections on the edges, didn’t need much in this case. Then I reattached the pieces, and voila!


~ Erica Baker, Indiana


via IKEA Hackers http://feedproxy.google.com/~r/Ikeahacker/~3/Dp7OSKoS-EY/floral-nordmyra-chair-makeover.html From Jules IKEAHacker

Malm King Bed with Floating Nightstands By: Jules IKEAHacker

malm


Materials: Malm King Bed and 2 Nightstands. Table Saw, Drill Press


Description: We wanted to go to a king bed, but have low windows on either side of the wall. Thanks to careful measuring and a neighbor with good power tools, my husband cut the back piece to the same height as the bed’s side rails, and then drilled new holes to mount the drawer. The nightstand attaches to the bed following the original instructions.


malm2

malm3


~ Anne Prestamo, Tulsa, OK


via IKEA Hackers http://feedproxy.google.com/~r/Ikeahacker/~3/35aTz7nsnhU/malm-king-bed-with-floating-nightstands.html From Jules IKEAHacker

Friday, November 8, 2013

Ratty Cage By: Jules IKEAHacker

ratcage4


Materials: EXPEDIT 2×4 shelf, ANEBODA back panel, BENNO shelf leftovers, RILL small rolls, roof battens, wire rack, drill and additional part for drilling large holes, jigsaw


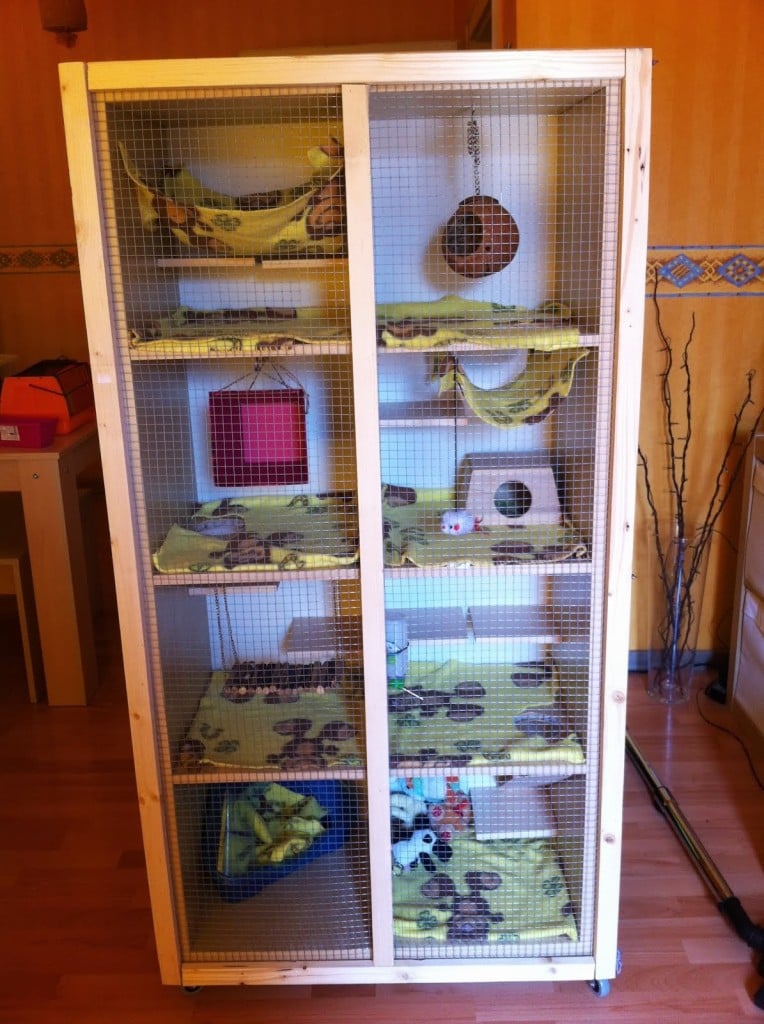
Description: We already had a large cage but it wasn’t as nice as a part of furniture so we decided to turn an EXPEDIT into a more stylish cage. Now we have only one ratty left but want to give another 3 mademoiselles a new home so it had to be big enough for at least 4-5 rats.


So we got a 2×4 storage unit and all additional stuff for a door and to make it moveable.

First we built one outside and the top, then drilled the holes, the ways from one ‘room’ to the other, and built it all together. When drilling the holes you should make sure not to drill it all way through but turn the board before it breaks and becomes chippy, as happened with our first hole.


Next we screwed the RILL rolls under the shelf and stuck the ANEBODA back with nails to it. We got all way round with the nails at the back, then measured where the boards run and stuck them too. Until now it wasn’t more than an hour to an hour and a half of pure work.


ratcage1

ratcage2

ratcage3


The door took more of our time.. We started with trimming the roof battens, which we screwed together with angular metal parts. There wasn’t the right wire rack at the hardware store, it was not wide enough, so we had to pick up another roof batten to make the wire fit. We put this part in the middle of the door, so we were able to make two rows of wire rack. Next it was trimmed to fit between the battens, by cutting it down to the right size there were really sharp edges which we bent down, beat them into the wood and fixed it with tiny cramps.


When the door was screwed on we screwed the BENNO leftovers into the cage and fixed them with nails through the back.


Finally we screwed little crotchets into the wood to fix different furniture pieces for our little ones.

We bought a deadlock to close the cage, but it didn’t fit in well so we had to improvise. We took a crotchet, a screw and a hairtie. The crotchet is screwed into the door, the screw into the storage unit and the hair tie holds the door in place.


Let’s hope their little castle will last long..


Total: 150$


~ Sacki


via IKEA Hackers http://feedproxy.google.com/~r/Ikeahacker/~3/oR7Q8dj1l14/ratty-cage.html From Jules IKEAHacker

IKEA Besta with oak worktop By: Jules IKEAHacker

ikea buro hack-784851

Materials: Ikea Besta and oak panels


Description: We take apart the desk and used the parts to measure the oak panels and made the drilling holes on the right spots. To connect the 2 oak pieces we used a lammelo machine and glued them together.


~ timmerwim, Netherlands


via IKEA Hackers http://feedproxy.google.com/~r/Ikeahacker/~3/8JO2sVpnbsY/ikea-besta-with-oak-worktop.html From Jules IKEAHacker

Patio lights from plant pot By: Jules IKEAHacker

patio lights


Materials: Plant Pot (Socker), Hemma cord set


Description: purchased 3 colorful Socker pots


Purchased 3 Hemma cord sets


Using hole saw we drilled holes in the bottom of the pots approximately 1/8 inch larger than the fixture on the Hemma cord set. Assembled the cords with lights inside of bucket. Hung them as a group of three, upside down from patio cover.


~ stacey zoyiopoulos, United States


via IKEA Hackers http://feedproxy.google.com/~r/Ikeahacker/~3/bC-bH1sH3Fw/patio-lights-from-plant-pot.html From Jules IKEAHacker

Thursday, November 7, 2013

How to fix Galant A-legs By: Jules IKEAHacker

Materials: Galant A-leg


Description: Having a couple of Galant style desks, with A type legs, I eventually ran into a problem that’s reported elsewhere: the leg cannot be “locked”. What happens is as follows:

1. One “unlocks” the leg by unscrewing it (anti or counter clockwise) to change the height.

2. The leg length is changed appropriately.

3. Attempting to lock the leg by screwing it clockwise results in it just turning and turning, and turning… And it doesn’t lock.


The chief culprit here is that the leg has been previously over-tightened. This aspect is most probably the least clear from the documentation, or the leg itself. How tight is enough? How tight is too tight? And no one wants a desk to fall down/over with a leg that is under-tightened.


(I can’t offer solid advice as to how tight is tight enough. However based on experience, once the leg grips, give it an extra twist – 1/4 – 1/2 rotation – by hand and that’s it. Don’t go further!)


So what to do when you have a “spinning leg”?


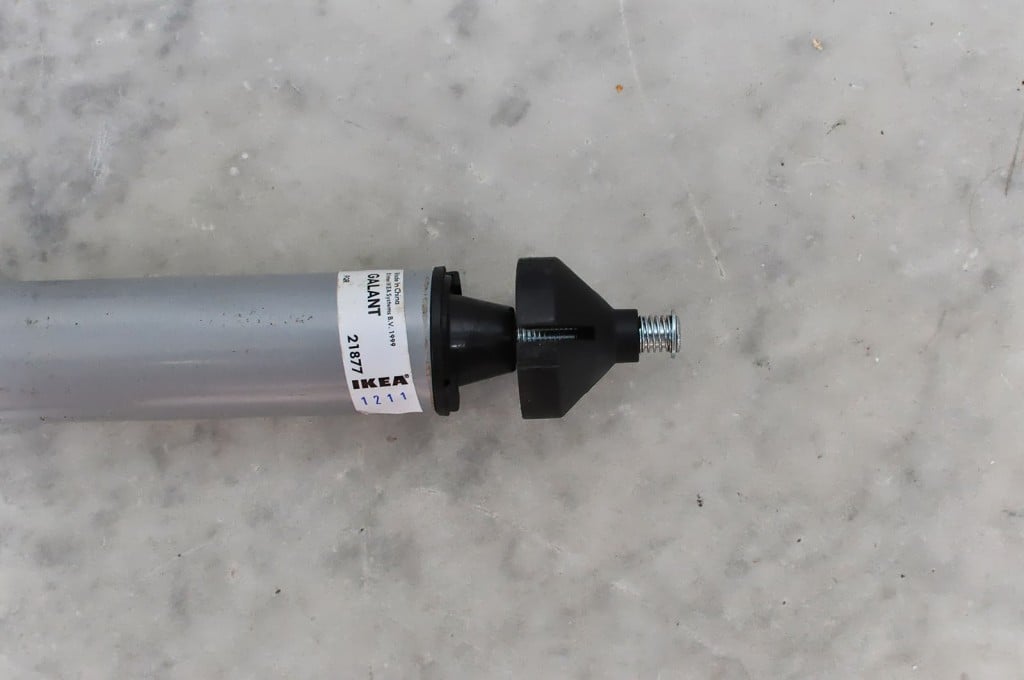
Step 1: Unscrew bottom part of leg, if necessary, and pull it out from the top part of the leg (Photo 1).


galant1


Photo 2 shows the two cones of the leg as it should be.

galant2


Photo 3 shows the two cones of the leg which suffers from this “spinning” problem. What’s happened is that the bottom cone has threaded itself onto the screw and so turning the leg results in the top part spinning as opposed to travelling down the thread. (To meet the bottom cone and then expand to lock the leg.)


galant3


Step 2: Grip the top of the threaded screw with pliers, but not the spring/washer structure, and unscrew the leg and bottom cone off the screw. You’ll know when to stop when the bottom part starts to spin on the screw because the thread only goes so far down the screw.


galant4


Photo 4 shows this done and it’s interesting to note that there’s a whole lot of plastic debris where the bottom cone has self-threaded itself onto the screw.


Step 3: Clear the debris with a knife or similar, see photo 5. Use super glue to lock the bottom cone to the screw, below the start of the thread. If necessary, also super glue the tabs of bottom part of the lower assembly of the bottom cone. (It’s not quite clear to me why this is free in the normal configuration – a manufacturing related design aspect(?) – but gluing everything results in a locked bottom part which is what you want.)


galant5


Step 4: With a knife, rough up both the surface of the bottom cone and the areas on the upper cone which contact the inside of the upper part of the leg. The whole leg works as a friction device and if the cones don’t grip – either to each other or to the inside of the upper part of the leg, then the leg won’t lock. (Indeed maybe this is a different type of spinning leg failure?)


I hope this helps!


Link:

autoresponse: colin.a.irwin@gmail.com

Name: Colin

Location: France


via IKEA Hackers http://feedproxy.google.com/~r/Ikeahacker/~3/9jbvg0rcqdw/how-to-fix-galant-a-legs.html From Jules IKEAHacker